Components check
So you've made and electronic device, as far as you know
everything appears to be ok, but, device ain't working like expected, or
even worse refuses to give any signs of life. What do you do? First, check
the circuit for mechanical failures, like disconnected wire, broken vias
on the board, connections between two adjacent vias which are not to be
connected, bad battery contact inside the case, broken pin of some
component, cold solder joint, etc. If this doesn't come with a result, you
should compare values of components and their connections with values and
connections between components on the schematic, maybe you put wrong
component in the wrong place, or you have read values in the wrong way,
maybe you forgot that k in front of an Ohm, maybe you connected supply to
the wrong pin of some IC. Next step, in case everything was ok with the
previous one, would be fault test for each of the components on the
circuit board, then if you find one, you should replace it with a working
one. You start troubleshooting by measuring DC voltages at certain points
of the board, and comparing these values to the ones on the schematic. So,
by knowing the operation of the circuit you start the process of
elimination to find the “suspect” component.
If there are several
“suspects”, and this is not a rare occurrence in complex devices, the
testing is divided into groups of components, you start checking in
reverse soldering order, this means that you start with components last
soldered, because those are the most sensitive components on the circuit
like integrated circuits, transistors, diodes, etc. After that, you should
check electrolithic capacitors, since they have a somewhat limited
lifespan and leave resistors and block capacitors as last in line since
they are sturdy little thingies and can take a lot of beating.
The
fastest and simplest method to do your troubleshooting would be using an
instrument for measuring resistance or the “ohm-meter”. Now, in almost any
case you wouldn't have an ohm-meter all by itself, since it is commonly
built together with an ampermeter and voltmeter in one instrument, called
AVO meter or multimeter. Another option if you're more on the nerd side
would be to build your own instrument we presented at the end of this
chapter, called “Conductivity tester”, but having this instrument is no
replacement for a nice and shiny multimeter.
The safest and most
accurate method would be to desolder the component from the board when
testing it, because other components could lead to wrong measurement, so
you would have to be very careful when testingin-circuit.
 Ok, you should know something about mutlimeters now. There are
two kinds of those: analog and digital. Analog ones are items of the past,
and since they use a needle to tell you values, it can be a bore sometimes
decyphering the right value. Digital ones, on the other hand have a nice
display and everything. You should go for this one, although both types of
components come in different sizes and with different abilities. Their
price is from several dollars, to several hundreds of dollars for really
good professional ones. Truth is that a two dollar digital multimeter
manufactured in some sweatshop of the far east will do a very good job for
you for many years, so you should really buy big pricey ones when you get
accustomed to working with electronics, and when your ubergeek ego demands
a novelty instrument (there is a slight possibility to make a beginner's
error and burn your instrument, so there isn't really the need to burn
hundreds of dollars when you can burn only two, right?).
Ok, you should know something about mutlimeters now. There are
two kinds of those: analog and digital. Analog ones are items of the past,
and since they use a needle to tell you values, it can be a bore sometimes
decyphering the right value. Digital ones, on the other hand have a nice
display and everything. You should go for this one, although both types of
components come in different sizes and with different abilities. Their
price is from several dollars, to several hundreds of dollars for really
good professional ones. Truth is that a two dollar digital multimeter
manufactured in some sweatshop of the far east will do a very good job for
you for many years, so you should really buy big pricey ones when you get
accustomed to working with electronics, and when your ubergeek ego demands
a novelty instrument (there is a slight possibility to make a beginner's
error and burn your instrument, so there isn't really the need to burn
hundreds of dollars when you can burn only two, right?).
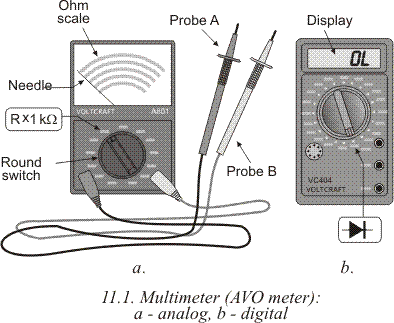
Two
instruments on 11.1 are some of the cheapest brand-name multimeters. They
are manufactured by VOLTKRAFT, first one is an analog instrument with mark
A801, and the other is a digital one marked as VC404. As you can see,
on the analog instrument, round switch is in position marked with Rx1kOhm,
which means that, if for example, needle shows the value 36, actual
resistance between the probes is R=36kOhm.
Switch on the digital
instrument points to a diode symbol.
1.
Diodes and transistors
 When using an analog instrument to test a diode,
diode is ok if it's resistance value is very small in one, and very high
in other direction. According to 11.2, positive end of the diode is
connected to one probe and negative end to the other probe (11.2a), and
then it is turned around (11.2b). In the first case, value should be very
low, and in the other it should be very high. When the multimeter shows
low value, diode's anode is connected to the positive probe of the meter
(red probe). If the value is equal to or near equal, either low or high in
both directions, diode is faulty, and should be replaced.
When using an analog instrument to test a diode,
diode is ok if it's resistance value is very small in one, and very high
in other direction. According to 11.2, positive end of the diode is
connected to one probe and negative end to the other probe (11.2a), and
then it is turned around (11.2b). In the first case, value should be very
low, and in the other it should be very high. When the multimeter shows
low value, diode's anode is connected to the positive probe of the meter
(red probe). If the value is equal to or near equal, either low or high in
both directions, diode is faulty, and should be replaced.
Digital
instrument has another method to test the diodes. It has it's own switch
position, as shown on 11.1b. When we connect probes to each other,
multimeter should sound a buzz which signals a short circuit, and display
tells 0. When we distance the probes, buzzing stops, and a symbol for open
circuit is displayed (this can be either 0L or 1). Now we conenct
probes to the diode (11.3a). Then we rotate the diode and connect it again
(11.3b).
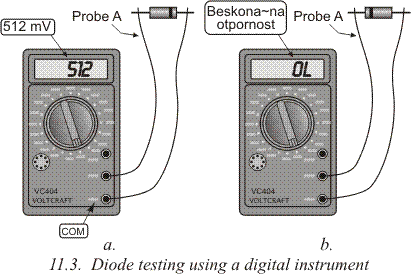
If the measured diode was ok, one of the two measurements would
have shown a value which represents a minimum voltage that could be
conducted through the diode (between 400mV and 800mV), and the anode is
the end of the diode which is connected to probe A (red one). Diode is
faulty if you hear a buzz (closed circuit) or some value which represents
infinity.
Transistors are tested in a similar fashion, since they act
as two connected diodes. Both diodes should be tested in described way,
and if both of them are functional – transistor is functional as well.
According to 11.4b, positive probe is connected to base, and the negative
probe is first at the collector and then emitter afterwards, in both cases
resistance should be low. After that, you do the same thing, only with
switched probes, negative probe is connected to the base and you test
collector and emitter with a positive probe, both cases should produce a
high value on the meter.

When testing
PNP transistors, all steps are the same, but the measurements should be
opposite: on 11.4a they are high, and on 11.4c they are low.
If you
test transistors using a digital instrument, process remains similar to
the one with diodes. Each diode should produce a value between 400mV and
800mV. Many modern day digital multimeters have a tool for direct
transistor check. There is, as displayed on 11.5, a special plug where low
and medium power transistors fit nicely. In case when there is a need to
test high power transistors, thin wires (0.8mm will do fine) should be
soldered to transistor's pins and then plugged into the instrument. As
displayed on 11.5, transistor is plugged into specified slot according to
it's type (PNP or NPN) and the switch on the instrument is brought into
position with a hFE marking. In case transistor works, display shows a
value which represents the current amplification coefficient. If, for
example, transistor BC140 is tested, and the display shows 74, this means
that the collector current is 74 times higher than the base current.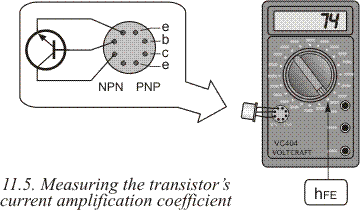
2.
Transformers and coils
Grid transofrmers are tested by measuring the resistance
of the copper wire on the primary and secondary coil. Since the primary
coil has more curls than the secondary one, and is wound using a thinner
wire, it's resistance is higher, and it's value lays in range between
several tens of ohms (in high power transofrmers) to several hundreds of
ohms, even to kiloohms (in low power transformers).
Secondary
resistance is lower and is in range between several ohms to several tens
of ohms, where the principle of inverse relations is still in place, high
power means low resistance.
In case an instrument shows an infinite
value, it is a certain sign that the coil is either poorly connected or
the curls are disconnected at some point.
Coils can be tested in the
same way as transformers – through their resistance. All principles remain
the same as with transformers. Infinite resistance still means
disconnected coil.
3.
Capacitors
DC capacitors should produce an infinite value on the
instrument. Eexceptions are electrolithic and very high value block
capacitors. When the positive end of an electrolithic capacitor is
connected to a positive probe of an analog instrument, and a negative end
to a negative probe, needle jumps to the lowest value and then gradually
comes back towards infinity. This is a proof that the capacitor is ok, and
the needle's movement is the charge stored in the component being
discharged. (Even small capacitance components get charged while testing,
but their discharge time is very short, so the needle doesn't have the
time to move.)
Variable capacitors are tested by connecting an
ohm-meter to them, and turning the rotor. Needle should point infinity at
all times, because any other value is a certain signal that the plates of
the rotor and stator are connected which means that the component doesn't
work.
There are digital instruments that have the ability to measure
capacitance, which simplifies the process to comparing the value on the
capacitor to the one on the display, any other value means that the
component is faulty. With this said, it is worth mentionig that the
capacitors have considerably wider tolerance than resistors, which goes
even to 20%.
4.
Potentiometers
To test a potentiometer, or a pot, or a variable
resistor, process is rather simple – you connect the component to probes
of an ohm-meter and turn the shaft, and values should do what component's
name says – vary. Of course, this behavior should be linear – jumps and
twitches in values mean that the component is not working as supposed to.
If that component was to be used in some audio amplifier, speakers would
produce loud noise or no sound at all while pot is being
turned.
(“Noisy” pot can be repaired using a special spray, or oil or
even a graphite pencil, but this is not a good solution since it is weak
and short-lived, and should be practiced only if there is no replacement
for that potentiometer)
5.
Speakers, headphones and microphones
When testing speakers, their variable coil has either 4
or 8Ohms in most cases, and the meter should show those values.
When
using an analog instrument on the speakers, not much of attention is being
paid to the value shown on the actual instrument, because by only
connecting the probes there should be a short noise heard. If there is no
noise, speaker is broken. Same goes for headphones and dynamic
microphones.
Electret microphones don't produce the noise. And another
source of trouble could be the built-in FET amplifier.